Nov 27, 2009

Reader Question: How can I recover from yoga induced wrist pain?

Bookmark and Share

Hello,

Last week I did a full primary series 2hour Ashtanga yoga class(my first one), and next day I woke up with some wrist pain to rotation on the right side. Then i noticed that i also had some forearm , elbow and upper trap tenderness too. i found that when I pressed on the sides of the elbow hard, my wrist didn't hurt any more. I did some research and found out that I was doing chaturanga wrong like you said on your site. Very, very informative! Thank you.

Any suggestions on healing?

A reader from Toronto

Rest, icing (10 minutes on, 10 minutes off, and 10 minutes on), and gently stretching are the keys to recovery from most minor joint injuries in yoga. But it is important to get a diagnosis from a health professional familiar with yoga injuries first before self diagnosing and treating.

It sounds like you have strained your wrist extensor muscles as well as possibly spraining the joints of your wrist. The extensor muscles start at the lateral epicondyle of the elbow (outside of the elbow with palm up) and control the movements of the wrist and hand. With repeated chaturanga push ups, these muslces are working overtime. And if you were allowing your wrist to deeply extend (dropping the elbow below the shoulder) this strains the wrist and the musculature.

Gentle Stretch for the Wrist Extensor Muscles
With your arm extended, palm facing down, use your opposite hand to flex the wrist down towards the earth until you feel a stretch in the top of the arm and into the elbow. Hold for at least 30 seconds.

When you return to your yoga practice, yes do all the things I've mentioned in the past during Plank Pose / Chaturanga (elbows not lowering below shoulder height, stacked over wrists or behind) and if you re-injure then you might want to consider seeking out some soft tissue treatment (I recommend Active Release Technique) as well as some guidance on how your shoulder biomechanics may be affecting your wrist and elbow. Never practice in pain.

Good luck with your healing.

To learn more about Dr. Robin and Yoga Therapy in Vancouver visit stayactive.ca

Reader Question: What poses benefit recovery from a sprained ankle?

Bookmark and Share

Dear Dr Armstrong;

I have an ankle that has been sprained a number of times, most
recently this past summer. It's a long-term weakness I'd like to try
and improve while/as I rehab from the last incident.

Just wondered if you saw any particular poses as being of most benefit.

Sincerely
A myyogaonline subscriber from Kelowna

Thanks for your email. Here are a few suggestions to try out.

When we sprain our ankles (an injury to the ligaments surrounding the joints) there are two major problems that result: a decrease in proprioception (the sense of where our ankle is in space), and a decrease in range of motion due to swelling, scar tissue, and pain limitations.

Balance poses standing on one foot are excellent to aid in proprioception that is probably diminished as you recover. In particular, balance poses where you are transitioning from one movement to the next. For example moving from Tree pose / Vrksasana (one foot on opposite shin or thigh, knee out to side) to Warrior III pose / Virabhadrasana III (hinged at waist, leg extended behind you).

Also poses that increase the range of motion will benefit you:
  • Downward dog / Adho Mukha Svanasana to lengthen calves
  • Fierce pose a.k.a chair pose / Utkatasana to lengthen calves and increase dorsi flexion
  • Standing poses such as Triangle / Trikonasana, warrior I, or II to stengthen and lengthen the sides of the ankle (being sure to root down with the outer foot)
  • Hero pose / Virasana (sitting in a kneeling position, most people would need one or more blocks under the seat or a folded blanket to give more height) being mindful that your knees are pain free in this pose.
  • Lunges with the back toes turned under will also challenge the range of motion and your blance at the same time.

Good luck in your recovery, I hope this helps.

To learn more about Dr. Robin, and her yoga therapy offerings in Vancouver, visit stayactive.ca

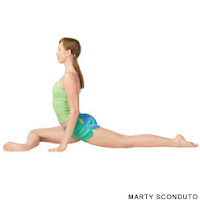
Pose Down: Eka Pada Rajakapotasana a.k.a. Pigeon pose

Bookmark and Share

My latest pose for myyogaonline

Eka Pada Rajakapotasana / Pigeon Pose

Benefits

  • Opens hip flexor muscles (psoas, rectus femoris), groins
  • Opens hip rotator muscles (gluteus medius & minimus)
  • May relieves sciatic nerve tension and ease chronic low back pain
  • Advanced version opens chest and shoulders
  • Traditionally thought to control sexual desire, increase circulation to urinary, digestive, and reproductive systems
Contraindications
  • Knee injury --> Meniscus or ligament injury
  • Sacroiliac joint injury --> due to the opposing action of the legs in this pose which may increase strain across the joint
  • History of shoulder dislocation ->do not progress to holding the top of the foot behind the back (Advanced b below) and use caution reaching behind you for the foot

Step by Step
Eka Pada Rajakapotasana (aa-KAH pah-DAH rah-JAH-cop-poh-TAHS-anna)
eka = one pada = foot raja = king kapota = pigeon

*A progression from intermediate to advanced versions will be given.

1. From your hands and knees, bring your right knee forward to the floor just behind the right hand. Outwardly rotate the right thigh so that the right foot is in front of the left knee, shin on a 45 degree angle on the floor. Strongly flex the right foot to align the ankle and shin bone. (Note: The further away the foot is from the knee, the greater the outward rotation in the hip, the greater the challenge)

2. Curl the left toes under and begin to press the floor away, walking the knee further away behind you until the leg is fully extended with shin, knee and thigh in contact with the floor. The right knee may come slightly outside of the line of the pelvis.

3. Draw your inner thighs towards each other, slightly lifting the pelvis higher. Find the middle point where equal weight is between the left and right sides, and your pelvis is squared to the front of your mat. If your right hip is off the ground, slide your left leg further back first, keeping the hips square. If the right hip continues to be off the ground use a folded blanket, foam block, or bolster under your right hip for support, keeping the hips square and level.

4. Uncurl your left toes, looking back to see that your ankle is in line with your shin, and your leg is running in a straight line behind you.

5. On an inhale, send your tailbone down towards the earth and the crown of your head up towards the sky. Exhale and slowly walk your hands forward in front of you, placing elbows on the floor or arms extended in front of you with torso on the floor.

6. Breathe slowly for at least 5 deep breaths.

7. Slowly walk your hands back up towards your body, placing the hands slightly wider than shoulder width. Send the head of the arm bones back, allowing the upper chest to lift slightly so that the collar bones are broad. Inhale sending the tail down and the crown up, walking the hands closer and closer to the body on an exhale so that the torso is moving towards an upright posture. Breathe here for 5 breaths or continue with the advanced pose below.

8. Advanced a): If you are able to painlessly and evenly stay in this posture while removing your right hand from the earth, you may reach your right arm behind you with the palm up. Draw your lower belly in to stabilize the spine, inner thighs moving towards each other. Bend your right knee and grasp the flexed foot with your hand. You may stay here and breathe or progress to the next stage.

9. Advanced b): Point the foot and slowly shift your hand to the toes of the foot by outwardly rotating the arm deeper, slowly lifting the elbow forward, upwards, and eventually backwards so that the palm is facing down. Press the left support hand into the floor to lengthen the waistline, keeping even weight in the left and right sides of the body. Breathe here or progress to the next stage.

10. Advanced c): If you are able to maintain your balance and stability draw the lower belly in, move the inner thighs towards each other, lift the left arm up and back, grasping the foot with both hands. Send the head of the arm bone back into the socket, keep the action of the lower belly and legs, and breathe.

11. Slowly, release the foot, place both palms on the floor and step back to Adho Mukha Svanasana / Downward Facing Dog. Return to your hands and knees and repeat on the other side.

Modifications / Cautions
  • Low back pain in the pose – if at any point you feel low back pain in the pose, back off, draw the low belly in and lengthen through the spine to avoid compression. A folded blanket, foam block, or bolster under the bent leg thigh will add support and may relieve the pain. Do not continue in pain.
  • Knee position – the knee is a hinge joint (open-close) and therefore should not be challenged from side to side. In pigeon pose the weight of the body and the pressure of the floor challenge the knee joint on either side. It is important to keep the ankle in dorsi flexion (toes up) to align the shin bone. If you are feeling any tension or pain around the front knee, back off, place the foot closer to the opposite groin, and consider a supportive blanket, block, or bolster under the thigh. Do not continue in pain.
  • Progressing to advanced versions – a belt may be used around the foot rather than holding with the hand. Before entering the pose, make a small loop in a strap and place it around the back foot at the ball of the foot. Set up the length of the strap on the floor beside you. Enter the first phase of the pose, during the second phase, bend the knee and grasp the strap a) arm behind you palm up, b) turn the palm down, externally rotating the shoulder sending the elbow forward, up, and back, or c) with both hands behind you. In each stage slowly walk the hand(s) back so that the tension increases on the strap.
To learn more about Dr. Robin visit stayactive.ca

Oct 23, 2009

Pose Down: Upavishta Konasana / Wide Angled Seated Forward Bend

Bookmark and Share

My latest pose for myyogaonline

Upavistha Konasana (Wide Angled Seated Forward Bend)

Benefits
  • Stretches Adductor muscles of the groin
  • Stretches Hamstring muscles
  • Strengthens the supportive musculature of the spine
  • Encourages activation of the core
  • Traditionally thought to increase blood flow to the pelvis, keeping it healthy

Contraindications
  • Low Back Pain: Sit up on a block or blanket, high enough that you can maintain the natural curve of your low back. When you are folding forward, use your hands for support on the floor. If you cannot safely enter and exit the pose without pain, it is not appropriate for you.
  • Sacroiliac Joint Pain: If you have been diagnosed with Sacroiliac Joint pain, avoid wide legged poses until the pain subsides. Return with caution, using your core to support you.
  • Pregnancy: The hormone Relaxin causes the bones of the pelvis to be more mobile that usual. Take your legs slightly less than 90 degrees, and gently lift and support the pelvic floor muscles (a Kiegel) to prevent unnecessary shearing in the pubic symphis. Do not allow your stomach to be compressed against the floor.
Step by Step
(oo-pah-VEESH-tah cone-AHS-anna)
upavistha = seated, sitting
kona = angle
1. Sit with your legs open to a 90 degree angle (with your pelvis in the centre). Flex your feet to align the knees, toes pointing up to the sky. If you feel your pelvis rocking back, or a loss of the curve in the low back, sit up on some height, allowing the pelvis to tilt forward.

2. Place the finger tips on the floor behind your hips. Inhale, drawing the sides of the body long, creating space in the spine. Stay here if you are feeling a stretch in the legs.

3. To move deeper, first support your low back using your core musculature. Draw the muscles of the pelvic floor gently upward (the same muscles you use to stop and start the flow of urine). Draw the lower abdomen gently in.

4. Start to walk the hands out in front of you, slowly, using your breath as a guide. Keep the spine long and lead with the heart. Stop when you feel you have reached a challenging but sustainable position. Rather than trying to get closer to the earth, imagine growing longer through the spine.

5. Advanced: If you are able to bring your chest to the earth, you may wish to reach for your ankles or feet. Keep your core muscles drawing in. If you are hovering above the floor, use a supportive prop to avoid straining the Sacroiliac Joints and the lumbar spine.

6. Breathe comfortably.

7. To exit the pose, reconnect with your core, and slowly walk the hands back towards your body. Use your hands to gently bend the knees, and bring the legs back together.

Modifications / Cautions
  • Knee Discomfort / Inability to straighten legs: Place a rolled up blanket or towel under the bend in each knee for support.
  • If you are in between the stage of supporting your self with your hands, and allowing your torso to meet the floor, use a bolster to rest your torso on, or a block for your forehead but ensure you are supporting your low back by gently contracting your lower belly.
  • Avoid rounding the lumbar spine to avoid stress on the discs between the vertebrae.

To learn more about Dr. Robin visit stayactive.ca

Sivasana: Even Blogs Need One

Bookmark and Share

Oh my it has been a while. But as the title of this post reads, even blogs need a sivasana once in a while.

To make it up to you I will post below a wonderful script for 61 points relaxation. This is a powerful way to shift from our sympathetic nervous system (fight or flight response) to our parasympathetic nervous system (rest and digest). The wonderful and surprising thing about our bodies is that we can trick them into a parasympathetic state. Simply by recreating some of the actions that occur during that state, our body will start to shift. Deep, slow breaths, which in turn cause our heart rate to decrease, which allow us to slow down and notice the tension in our body - and voila we are in a parasympathetic state of being.

Enjoy a deeper, calmer state of being.
61 Points Relaxation
Lie in sivasana.
Begin to slow down your breathing – taking deeper inhales and longer exhales.
Become aware of your right thumb and mentally say ‘right thumb’ without moving. Bring your awareness to:

Right hand thumb, first finger, second finger, third finger, pinky finger, palm of the hand, back of the hand, wrist, lower arm, elbow, upper arm, shoulder, armpit, waist, hip, thigh, knee, calf muscle ankle, heel, top of the foot, sole of the foot, right big toe, second toe, third toe, fourth toe, fifth toe.

Now go to the left side. Become aware of the left hand thumb, first finger, second finger, third finger, pinky finger, palm of the hand, back of the hand, wrist, lower arm, elbow, upper arm, shoulder, armpit, waist, hip, thigh, knee, calf muscle ankle, heel, top of the foot, sole of the foot, left big toe, second toe, third toe, fourth toe, fifth toe.

Next move to the back of the body. Back of the head, back of the neck, right shoulder blade, left shoulder blade, right buttock, left buttock, right heel, left heel.

Now the front of the body. Top of the head, forehead, right temple, left temple, right ear, left ear, right eyebrow, left eyebrow, middle of the eyebrows, right eye, left eye, right nostril, left nostril, whole nose, right cheek, left cheek, upper lip, lower lip, both lips together, chin, neck ,right collarbone, left collarbone, right side of the chest ,left side of the chest, middle of the chest, navel, upper abdomen, lower abdomen, right leg, left leg, right arm, left arm, the whole of the head. The whole body, the whole body, the whole body.

Become aware of the body lying on the floor. Bring your awareness to the points of contact between your body and the floor. Both heels are on the floor and there is a point where they touch the floor. Now, from the top of the body. The head and the floor, the back and floor, the right hand and the floor, the left hand and the floor, the right elbow and the floor, the left elbow and the floor, the buttocks and the floor, the hamstrings and the floor, the heels and the floor. Imagine the meeting points of the body and the floor, the whole body and the floor. The body is on the floor. Become aware of the whole body, the whole body, the whole body.

Slowly bring your attention back to the room, making small movements with the body. Roll to your side and come back to sitting.

To learn more about Dr. Robin visit stayactive.ca

Jun 18, 2009

Pose Down :Utthita Trikonasana /Triangle Pose

Bookmark and Share

My latest pose break down from myyogaonline.com
Benefits
  • Expands chest and shoulders
  • Increases mobility of hip joints
  • Increases neck mobility
  • Stretches spinal muscles
  • Strengthens and tones muscles of the thighs
  • Stretches calf muscles, hamstrings, hip musculature
  • Increases proprioception (sense of position in space) of feet and ankles

Contraindications
  • Neck pain: keep the head level and look straight forward.
  • Low Back pain: turn the back foot in slightly to limit force across the Sacroiliac joint, and allow the hip to naturally rotate inwards.
Step by Step
Utthita Trikonasana (oo-TEE-tah trik-cone-AHS-anna)
utthita = extended, trikona = three angle

1. Stand at the top of your mat in mountain pose. Take a big step back (approximately 3+ feet) with your right foot, turning your foot towards the side of the mat while keeping your left toes pointing forward. Your two hip points are now facing the side of the mat.

2. Take the arms out in a “T” with palms pointing down; shoulders relaxed moving shoulder blades down the back.

3. Begin to hinge at the hip towards your left leg, deepening the crease where the hip bone meets the pelvis. Continue to reach out through the top of the head, keeping the spine long, and both sides of the torso of equal length. Lift the knee cap of the front thigh, contracting the quadriceps to support the knee.

4. Allow your left hand to float towards your (from beginner to advanced) shin, a block on the inside of the foot, a block on the outside of the foot, or your fingers/palm on the mat or big toe. Your right arm will float up towards the sky, keeping the arms in a “T”. Whichever hand position you choose for your bottom hand, ensure you keep your spine and torso long, without creating a bend in the waist. Draw the low belly in to support the lower spine.

5. Tuck your chin in slightly, lengthening the top of the neck near the skull, and turn your gaze up towards your right hand.

6. Keep your connection with the earth, especially grounding with the outside of your back foot, and all four corners of your front foot.

7. Breathe comfortably.

8. To exit the pose, on an exhale look down towards your left foot, draw the low belly in, root down through the feet, and inhale as you rise up. Turn and step back to the top of the mat and repeat on the opposite side.
Modifications / Cautions
  • Use satya, truthfulness with yourself to determine how far you will enter into the pose. Often backing off our furthest limit in Trikonasana allows a better opening in the pelvis and shoulders.
  • Although the intention is to square our hips to side of the mat, do not force this action which can put unnecessary stress across the joints of the lower back. To increase the opening of your pelvis, move from your feet. Connecting strongly through both feet (as above) to allow movement to trickle up to the pelvis. Imagine the tailbone lengthening away from the crown of the head and the crown away from the tail.
  • Maintain space between the ribcage and the pelvis on both sides of the body. Focus on keeping the spine long and avoid crunching the ribs into the pelvis.
  • If you have neck pain, keep the head level and look straight forward.
To learn more about Dr. Robin visit stayactive.ca

Jun 10, 2009

To prop or not to prop - That is the question


Bookmark and Share

Imagine feeling completely weightless and light in Sirsasana/Headstand, or have balance and openness in Trikonasana/Triangle Pose. These are just some of the poses that can benefit from props. Things like wooden blocks, foam bricks, straps, bolsters, blankets, even chairs can change the way you practice. Allowing you to experience poses in a completely different way.

Some yoga traditions, such as Iyengar, heavily rely on props to enhance the practice. Whereas others - Ashtanga or Anusara for example- tend to be light on the props, with the exception of a block or strap here and there.

Why would I Use Props?

A yoga prop is not a crutch. When used correctly, props can allow us to experience the true essence of a pose, actively recruiting the correct musculature, and relieving strain in other areas.

Props also allow us to practice OUR yoga for our own bodies. We do not all have the same length of torso, shape of our humerus/arm bone, or length of femur/thigh bone. When we use a prop to modify a pose we can often feel lightness, stability, and access our strength in a very individual way.

Often deciding to use a prop, especially if you do not typically use one, can be a battle with our ego. Maybe our teacher only suggests props for beginners or people with inflexibility. A prop can be a way to advance your practice, not simply slow it down. When we back off of our edge, we can often gain new insight into how the pose "should" feel in our body.

Prop This

Ardha Chandrasana / Half Moon Pose

Props: Wooden or foam rectangular block

Place the block at the top of your mat, on the floor about a foot in front. From Tadasana/Mountain pose, step back into Virabhadrasana II/Warrior 2. Your back foot is parallel to the end of the mat, and your two hip points/iliac spines are facing the side of the mat, as we lunge into the front knee.

From here, place your back hand on your hip, slowly begin to shift your weight into your front leg, allowing your front hand to float towards the block in front of you. You may be able to reach the floor, but experiment with a block. Remember, the block has three heights, find the one that works for you. Press the hand into the block allowing your chest to expand and open to the side of the mat. The back foot is flexed, toes pointing towards the side wall. Taking your time, raise your top hand up towards the sky, maybe eventually shift your gaze up towards your palm.

Exit the way you entered, and switch sides.

Setu Bhandasana / Bridge Pose

Props: Wooden or foam rectangular block, strap/belt/tie

Set up your strap so that it makes a loop. Place it around your elbows with arms in front of you, the loop should be only as wide as your arms are firmly by your sides. Remove the strap and put it aside for a moment.

Lie on your back with feet hip width apart, parallel to each other. Place the block between your thighs (keeping the legs hip width) approximately one inch above your pubic bone. Press into the feet, lifting your hips up off the floor. Reach for your strap and place it around your arms, just above the elbows, with your arms behind your back. Bend the elbows so that your humerus/arm bone is on the floor, and your hands are pointing up towards the sky. Press your arms into the floor and feel the expansion of your chest. Notice the connection of the shoulder blades on the back. Squeeze the block and feel the release in the sides of the hips. Lift your hips a little higher and open your chest more, sending the heart up and back. Before lowering, remove your strap, then lower the hips to the earth.

These are just two examples of how props can enhance your practice, allowing you to experience a deeper version of the pose.

To learn more about Dr. Robin visit stayactive.ca

May 15, 2009

Pose Down: Urdhva Mukha Svanasana, Upward Facing Dog Pose

Bookmark and Share

My latest pose descriptor for myyogaonline. Upward Facing Dog - a classic.

Urdhva Mukha Svanasana (Upward Facing Dog)

Benefits
  • Expands chest and shoulders
  • Strengthen muscles that control the shoulder blades
  • Stretch hip flexors and core musculature
  • Strengthen low back musculature
  • Relieves some forms of low back pain
  • Therapeutic for asthma sufferers to open the accessory muscles of breathing

Contraindications
  • Carpal Tunnel Syndrome or tendonitis of the wrist
  • Low Back pain aggravated by extension
  • Pregnancy

Step by Step
Urdhva Mukha Svanasana (OORD-vah MOO-kah shvon-AHS-anna)
urdhva mukha = face upward, svana = dog

1. Lie on your stomach with the tops of the feet on the floor. Place your hands beside your rib cage with fingers spread wide, finger tips below the line of the chest.
2. Press into the hands, feeling the ball joints of the fingers (under the knuckles) in contact with the mat. Squeeze the elbows by your side, roll the shoulders onto the back body, and reach out through the top of the head.
3. Draw the low belly towards the spine, create a slight inward rotation of the thighs, and press the toenails into the mat.
4. On an inhale, press into the palms, imagining you are sliding your body along the earth. Lift your torso and hips off the mat, so that it is only the tops of the feet and the palms in contact with the earth.
5. Tuck your chin in slightly, lengthening the top of the neck near the skull, and reach out through the top of the head but keep your gaze down your nose. Imagine the back bend coming from your heart centre, sending the sternum forward, while keeping the drawing in of the low belly.
6. Breathe comfortably in and out or transition to your next pose.

Modifications / Cautions
  • Avoid rolling in the tops of the arms bones or shrugging , both of which can lead to impingement of the rotator cuff muscles in the shoulder. Instead, squeeze your elbows close to your side, rolling the shoulders onto the back body so that you are broad across the collarbone and send the shoulder blades down the back, increasing the expansion of the chest and the space for the neck. You should not feel any pinching sensations in your shoulders.
  • If you are experiencing wrist pain, ensure a broad and open connection with the shoulders (as above). Distribute the weight evenly into the hands and all five fingers, avoiding compression at the wrist itself. The wrists should be stacked under or slightly in front of the shoulders.
  • If you are experiencing low back pain, instead of focusing on the action of extension or back bending, think more about length through the spine, reaching out through the top of your head to grow longer. Draw the low belly in to support the low back. Connect all 10 toenails to the earth, pressing the feet into the floor. You can also use a block between the thighs to squeeze and activate the adductor muscles of the groin, often relieving pressure in the low back. Avoid gripping through the buttocks, but allow a gentle contraction.
  • If you have neck pain, keep the head level and look straight forward.
To learn more about Dr. Robin visit www.stayactive.ca

May 11, 2009

Relaunch! Smart Yoga becomes Yoga Savvy!

Bookmark and Share

It's a relaunch! We've got a new name (Yoga Savvy), new look (see), more features (subscribe, share, follow me on twitter), but the same great info about alignment, avoiding injuries, and using yoga therapeutically. As an ode to our past, lets revisit the very first post:

Yoga Savvy - the blog - is here.

The purpose of this blog is to give you the tools to stay safe, practice with alignment, and above all, feel great in your yoga practice. I will highlight the latest scientific research in the yoga world, great books on yoga anatomy and yoga therapy, and share my insights on injury avoidance and prevention, as well as alignment based on our anatomy.

It's smarter yoga - why would we practice any other way.

To learn more about Dr. Robin visit www.stayactive.ca

May 8, 2009

Yoga for your Foundation: Your Feet

Bookmark and Share

How many times have you come to Tadasana / Mountain Pose and your yoga teacher has encouraged you to feel your connection to the earth, or balance your weight on all four corners of the foot, or to lift and spread your toes? There is a reason teachers like to point out your feet – and it doesn’t have anything to do with your latest pedicure..... Read more

To learn more about Dr. Robin visit stayactive.ca

Apr 2, 2009

Pose Down: Ardha Matsyendrasana / 1/2 Lord of the Fishes

Bookmark and Share

I will be describing some yoga poses for myyogaonline.com in the next few months.....here is the first one. Try it again for the first time....

ArdhaArdha Matsyendrasana / Half Twist

By Robin Armstrong

Benefits

* Increase spinal flexibility and range of motion

* Expands chest and shoulders

* Relieves thoracic/mid back spinal tension

* Strengthens abdominal oblique muscles

* Stretches hip rotators and hip abductors

* Traditionally thought to massage abdominal organs, detoxify liver and kidneys, and stimulate digestive fire

Contraindications

* Lumbar disc disorders à keep the natural curve in the low back and avoid rounding

* Neck problems à gaze straight ahead with head centered on body

* Shoulder problems à do not take the bind of the arms behind the back as this requires a great deal of inward rotation and extension

* Knee problems à Practice the straight leg version below, avoiding crossing the knee underneath you

Step by Step

Ardha Matsyendrasana

(ARE-dah MOT-see-en-DRAHS-anna)
ardha = half Matsyendra = king of the fish (matsya = fish, indra = ruler), a legendary teacher of yoga

1. Begin by sitting on the floor with both knees bent, feet flat on the floor. Slide your right foot underneath your left leg so that the right leg crosses with the foot on it’s side, near the left hip. Step the left foot across the right bent knee so that the foot stands on the outside of the thigh. Try to keep both sitting bones in contact with the earth.
2. Lean back with your left hand and inhale the right arm overhead, creating space.
3. On an exhale, twist to the left bringing your right elbow to the outside of your left thigh, keeping your hand in a stop sign position.
4. Gaze over the left shoulder with head held high.
5. With every inhale, subtly get a little taller through the spine. With every exhale, twist a little deeper.
6. Be mindful of your support hand on the floor. Depending on the length of your arms and the height of your torso, your palm is either on the floor or your hand has spider fingers on the mat. Draw in towards your centre – lower belly in, inner thighs towards each other – to get weight out of the support wrist.
7. Breathe slowly and stay for 30 seconds to 1 minute. To exit, inhale to look forward, and exhale release the twist. Reverse your legs and repeat twisting to the opposite side.

Modifications / Cautions

* Binding the arms – An advanced variation of the arm position is to move into a bind behind your back. When entering into the twist, keeping the spine tall, try to get your armpit close to the thigh. From the hand in stop sign, rotate at the shoulder so that the hand moves closer to the floor. Hinging in the elbow, weave the right arm through the bent left leg, bringing the back of the hand onto the torso. With the left arm, create the same inward rotation at the shoulder, bringing the hand to connect with the right fingers, or grasp the right wrist, behind the back. Stay broad across the collarbones, and tall through the spine.

* Straight leg – You may also practice this pose with the underside leg straight. In the version above, your right leg would extend out, toes pointing up, and your left foot would cross over the thigh.

* If you find you are tipping over, or rounding through the lower spine, you may take some height underneath the sitting bones. Arrange a foam brick or a blanket so that your sitting bones are on the edge, the pelvis is tipping forward, and you maintain your lumbar/low back curve.

* If your right elbow does not quite reach the outside of the thigh, you may keep your arm straight, bringing the forearm in contact with the thigh.

To learn more about Dr. Robin visit stayactive.ca

Avoiding Wrist Pain in Yoga

Bookmark and Share
Like my tennis coach once said, “It’s all in the wrist.” With our technology and computer-centered lifestyles, this statement couldn’t be more true off the tennis court. Most of us spend at least some of our day perched in front of the computer with our wrists cocked, making millions of repetitive, tiny movements with our fingers. In fact, the average computer user moves their fingers up to 15 miles per day.....read more

To learn more about me visit www.stayactive.ca

Mar 16, 2009

Top 5 Poses for a Strong Core

Bookmark and Share
By now the news has spread: a strong core is in. The ancient sages have known this for centuries; it just took us a while to catch on. Here are the top five yoga poses that can strengthen your core, help you improve your posture, avoid back pain, and enhance your yoga practice......Read More

To learn more about me check out www.stayactive.ca

Inspired: The connection between our shoulder girdle and our rib cage, my weekend with Susi Aldous


Bookmark and Share
Last weekend I was lucky enough to study again with my therapeutic yoga teacher, Susi Hately Aldous. Every time I study with her I learn something new about my own practice.

Shocking
This time I made a shocking discovery: I have very limited movement in my shoulder joint. I am referring to the motion of my humerus (arm bone) in the shoulder socket (glenoid). I discovered that as I moved my arms overhead in forward flexion, I could not get above shoulder height without hinging in my lower thoracic spine (mid back) and jutting my rib cage out. This is a classic example of our bodies adapting to enable motion. When we are limited in motion at one joint, the motion will get transferred to the joint above or below. Or if we cannot create the true motion (arm bone flexing in shoudler socket for example) we find a way to mimic the motion (creating extension in my spine).

The Relationships within our own bodies
The shoulder girdle (humerus, clavicle, scapula) has an intimate connection with our rib cage. The scapula glides on the ribcage moving in protraction (wrapping around the ribs), retraction (shoulder blades squeezing together), elevation (moving upwards) and depression (moving downwards). The rib cage, in turn, has an intimate relationship with the spine. The ribs attatch at the transverse process of each vertebrae (the wings of the vertebrae) to wrap around and either connect with the sternum, or with the rib above. If there is a restriction in the spine (ex. stiffness, lack of motion) then this will affect the ribs, which can change the relationship to the shoulder.

Try This: Susi has a great exercise to bring awareness to the relationship between the shoulders, ribs, and spine. Roll up your yoga mat and place it so that when you lie back on it, the bottom is just below your shouler blades and your head is supported. Lie with your knees bent, feet flat on the floor. Raise your arms to shoulder height so that your fingers are pointing up towards the ceiling, bringing thumbs to touch. Slowly, without hiking your ribs, without pinchy, or funky motions, begin to lower your arms overhead - stopping if you do feel a pinch, or strange motion. Slowly go back to the start and repeat. Only go as far as your ears. Repeat for 2 minutes or so. Then remove your mat and lie flat on your back. Notice what you're noticing.

To learn more about Dr. Robin and Yoga Therapy in Vancouver visit stayactive.ca

Keeping the Ouch out of your Om: The top 5 Yoga injuries


Bookmark and Share
Check out my February article for Joyyoga.ca

The yoga community has many things in common – a respect for the earth and those around us, an appreciation for inner calm and a quiet spirit, a love of clothing that enables us to stand on our heads without restraint. Then there are the less glamorous things we share – our injuries. Here are the top 3 yoga injuries, and how to avoid sharing them.

Yogi Butt – Although this might sound appealing initially (picture Madonna in your favorite skinny jeans), this is an injury that is best to be avoided. Yogi Butt is actually small tears of the hamstring that attaches at the sitting bone. With overstretching in forward bends, little tears can develop and start to cause a nagging pain in the butt – literally and figuratively.

Try This: To avoid this injury, before moving into forward bends, gently draw your lower belly in and up to stabilize your core and tilt your pelvis downwards at the sitting bones. Always keep a micro bend in your knees to take strain off the hamstrings, and to support the knee joint.

Yogi Shoulder – The local swim clubs might argue they claimed this one first - a.k.a. Swimmers Shoulder or Shoulder Impingement – but yogis too can experience this shoulder problem. Aching or sometimes sharp pain can result when we close down the space at the front of our shoulder. Often this injury shows itself in a Vinyasa style practice, with lots of chaturanga/push up poses. You can avoid it by visually creating space at the front of the shoulder.

Try This: Practice by standing with the elbows bent by your side, wrists flexed like you are in a push up. Round your shoulders forward and see how the space between your arm bone and your collar bone closes. Now open your shoulders so that the shoulder blades slide down the back, the tops of the arm bones move up and back and you can see more space at the front of your shoulder. Notice what you had to do in your body to create this space. Now take it to your mat!

Yogi Knee – This injury is a simple one to avoid if you understand how the knee works. Basically your knee moves like a door – hinging open and closed. Try to force your door to twist and you break it off its hinges. Try to force your knee to twist and ‘ouch’! Remember the classic song, “The shin bone’s connected to the - thigh bone…”? If our hips are tight, the motion gets transferred to the next available joint – the knee.

Try This: Move with awareness and respect into your hip openers, avoid any strange sensations at the knee (Would you open your front door to a stranger?), and use your other connection -your ankle- to keep your knee alignment by flexing the foot and toes up.

Dr. Robin Armstrong is a Chiropractor and Yoga Instructor in Vancouver, BC. Learn more at www.stayactive.ca.

Feb 17, 2009

Leg bone's connected to the thigh bone....


Bookmark and Share
Knee Safety in Hip Openers: My latest article for www.myyogaonline.com

Remember the children’s song: With the leg bone connected to the knee bone and the knee bone connected to the thigh bone…? This could be a yoga anthem worth chanting before class. Our bodies function as a whole, and no one action goes without a counter action, reaction, or complementary action in another part of our anatomy. This is especially important to remember when it comes to hip openers, which can unfortunately lead to the non-existent ‘knee opener’ which is yoga code for a painful and long recovery from an injury to our knee.

The Anatomy
The knee joint is actually composed of two joints: The femur bone of the thigh as it meets the tibia bone of the shin, and the patella bone of the knee cap as it lies on top of the femur. The patella is held by the tendon of the quadriceps, the main muscle that acts to extend / straighten the knee. If we contract our quadriceps, our knee cap rises.

The femur and tibia are connected by four major ligaments: Two cruciate ligaments (anterior and posterior) and two collateral ligaments (medial and lateral). These ligaments help prevent excessive motion at the knee. There is another important structure at the knee that is unfortunately one of the more common sights of injury in a yoga class – the meniscus. There are two menisci, medial and lateral (inner and outer), which are thin pieces of cartilage that act as spacers in between the femur and tibia, evenly distributing weight at the joint. The meniscus becomes prone to tearing when the knee is in full flexion combined with twisting.

The Biomechanics
This brings us to the biomechanics of the knee. The main action of the knee is flexion to extension. It is known as a hinge joint, meaning it hinges open like a door. Try to twist open a door and it rips off its hinges, try to twist at the knee and you leave it vulnerable to injury. There is a slight amount of tibial rotation on the femur between 0 degrees and 20 degrees of flexion, known as the screw home mechanism. This action is so the bones glide on one another as we unlock the knee from extension.

Yogi's Knees
Twisting at the knee is not something we generally try to do in yoga. When it does come into play, however, is in hip openers. If our bodies meet resistance at one joint (limited rotation at the hip), the motion is transferred to the next joint (the knee). Except, we know the knee does not twist. There are no poses in yoga that ‘open’ the knee. You may feel tension at the back of the knee in forward folds (stretching the hamstrings which attach on either side of the knee), maybe some slight tension at the outside of the knee with poses that lengthen the iliotibial band (a band of connective tissue that runs from the knee to the hip), but in hip openers we should never feel sensation in the knee.

Meet Your Hip
In order to achieve hip opening a few things need to occur. First, our femur bone must rotate in the acetabulum (hip socket). This is an aspect that is sometimes overlooked. We all have different shapes to our bones. Some of us have shapes that allow a large freedom of movement in the hips, and others among us will be limited by our bony architecture. No amount of stretching can change the shape of our bones.

The other action that needs to occur is lengthening of our hip rotator muscles (the piriformis and friends, and the gluteus group). The irony of our western lifestyle is that we spend our days sitting in a chair, tightening our hips ,so that we have come to a yoga class to sit and open our hips. This is an aspect we can change with patience, acceptance, and grace. A lot of emotions can be stirred up when we start to open our hips.

Let’s take a closer look at two popular hip openers.

Thread the needle pose
. This is a safe and effective hip opener that is accessible to all yogis from beginners to advanced. It also takes out gravity, decreasing the risk of injuring our knees. Have a strap near by as you lie on your back, knees bent feet flat on the floor. Pick up your right leg and cross yourankle just above your left knee on your thigh. Remember the other connecting joint – the ankle. When we dorsi flex the foot (toes towards shin) this places the ankle in neutral and aids alignment at the knee. Allow your right thigh to spiral out, inner thigh moving towards you, outer thigh moving away. If you feel sensations at the knee, back off and allow your body to naturally soften into the pose.Using your strap or your hands, wrap around the under side of your right thigh, pulling it towards you. Your head should comfortably rest on the mat. Continue to rotate your hip outwards. This is an excellent prep for other hip openers as you are always in control of how much opening is actually happening.

Pigeon Pose / Eka pada rajakapotasana
. In this advanced hip opner, we sit with one leg extended behind us, and the front leg folded in front of us, knee slightly wider than our same side hip. Our bony anatomy comes into play here. Our front hip needs to deeply externally rotate which means our femur bone must be a certain shape that it can achieve 45 degrees or more of rotation in the acetabulum. If this rotation is limited by either our bony or muscular anatomy, the motion starts to transfer to the knee. Just as we did above, dorsi flex your foot to neutralize the ankle and align the knee. Start with your foot close to your pelvis. This placement requires less opening at the hip. As your hips open, you can move the foot further away from your pelvis so that your shin is moving towards perpendicular to the mat. This might take a few lifetimes of practice, so be patient. You should not feel any sensation in your knees. If you do, back off, or slowly remove yourself from the pose. If you have a history of knee pain, or very tight hips, Pigeon pose is not for you. Stick with thread the needle pose.

Yoga can be a wonderful way to strengthen and support our knees. Knowing a little more about our anatomy, and the connections between our different parts can allow us to safely move deeper into our yoga practice with confidence.

Dr. Robin Armstrong is a Vancouver chiropractor & Yoga Instructor. www.stayactive.ca.

Feb 2, 2009

Thoughts from the mat - Downward Dog & the Natural Lumbar Curve


Bookmark and Share

As I was beginning my own yoga practice the other day, feeling a little stiff-spined in the morning, I thought - hey, where did my low back curve go? Tilting my pelvis forward slightly, and bending my knees gently, a familiar feeling returned. Ahhh, my curve.

Suddenly flashes of students in stiff downward dogs with flat or rounded low backs appeared before my eyes. How could I have stood by silently for so many hours!

Some might call it an "aha moment". Although some flattening of the natural curve in our low back may occur in downward facing dog, our curves are there for a reason. We don't want to move in the opposite direction either, increasing our curve until our facet joints in our low back jam into each other. But there is, as they say, a middle path. When we round our low back, our discs move backwards, into a position where they are most vulnerable. In turn, we loose our connection with our core, which naturally enables a curve.

Next time you are on your mat, see what it feels like to you. Bend your knees and tilt your pelvis until you become aware of the curve in your lower spine. This might feel awkward or different from what you are used to. But it just might be the smarter yoga.

Jan 22, 2009

A Gentle Reminder - Benefits of Yoga


Bookmark and Share
I recently delivered a talk about the benefits of yoga at lululemon.

Here are some highlights.....some might be familiar, but it never hurts to remind us of all the fabulous benefits of yoga done smartly!

Benefits of Yoga

Keep joints healthy. Our joints receive nourishment through movement. As we move we flush out toxins and stale fluid, and suck in new, nutritious fluid.

Improve Strength & Balance. A recent study in the Journal of Strength and Conditioning followed young adults over an 8 week program of Bikram Yoga. They found substantial improvements in balance and modest improvements in leg and arm strength.

Aid in controlling stress, anxiety, & depression. A recent study examining the use of Iyengar Yoga to control depression found that participants had significant reductions in depression, anger, and anxiety.

Decrease risk factors for chronic disease. A review of published studies using yoga found that yoga interventions are generally effective in reducing body weight, blood pressure, glucose level and high cholesterol.

Strengthen the Core. Using traditional yoga practices (uddiyana bandha and mula bandha) activate the muscles that support our centre. (See my recent article from Alive Magazine)

Keep bones healthy & strong. Weight bearing activity, such as the standing postures in yoga, allow our bones to rebuild and strengthen, thus preventing osteoporosis.

Recently, a wealth of scientific research has been published supporting the benefits of yoga for a variety of conditions. Yoga can aid in treating common diseases & conditions such as:

v Decrease discomfort during labour, improve pregnancy health

v Decrease Menopausal Symptoms such as hot flashes and night sweats

v Decrease PMS symptoms

v Treat Carpal Tunnel Syndrome

v Treat Osteoarthritis of the hands, osteoarthritis of the knees

v Treat Chronic Low Back Pain

v Adjunct therapy for patients undergoing cancer treatment

v Adjunct therapy for patients on Kidney Dialysis

v Improve inflammation and exercise capacity in chronic heart failure patients

v Improve quality of sleep in seniors

v Aid in treatment of migraine headaches

v Aid in treatment of Type II Diabetes, Asthma, Hypertension

v Increase function in women with hyperkyphosis (hunch back)

Use this info to inform your students, your friends, or your family members to let them know all the benefits of yoga!